Like I was saying yesterday, these
Magical Buns of Delight (snicker, chuckle, giggle) make Christmas ten thousand times better than it already is. That means Christmas 2010 was wonderful multiplied by googooplex infinity. It was pretty damn good. And I'm happy to say that my Lithuanian Bacon Buns are back from their long hibernation.
(This recipe is adapted from the heirloom cookbook Popular Lithuanian Recipes by Josephine Dauzvardis.)
Lithuanian Bacon Buns
Ingredients:
2 lbs bacon, thick cut, try to get bacon with as much meat as you can find
2 large onions, finely diced
2 cups milk (my favorite non-dairy alternative is Unsweetened Original Almond Milk by Blue Diamond)
1/2 lb butter (I did not try a non-dairy alternative to butter as butter is supposedly ok for us casein sensitive types)
1/2 cup sugar
1 tsp salt
1 pkg. granular yeast
6 large eggs
6 cups all-purpose flour (the gluten-free flour alternative I used was Pamela's Gluten-Free Bread Mix and Flour Blend, it ROCKED)
Preparation Method:
Begin early in the morning. Allow yourself at least seven hours from start to finish.
Say hello to your morning by slicing the bacon into very small pieces. Tip: Place the bacon in the freezer for about an hour prior to working with it. Really cold bacon is so much easier to chop.
Now chop into even smaller pieces.
Dice the onions into really small pieces as well.
Place all the bacon and onions into a large frying pan with tall sides.
Mix together.
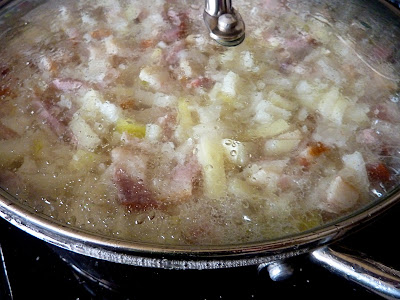
Cover with water. The bacon and onions will be swimming graciously in the pan now.
Turn heat to high and bring to a boil. Cover and turn heat to low. Simmer for about two hours. Now that the bacon and onions are on the stove to simmer, it is time to begin preparing the dough.
Heat 2 cups milk and 1/2 pound butter on the stove on med-low heat. Melt butter completely. Add 1/2 cup sugar and 1 tsp salt.
Remove 1/2 cup of this liquid into a separate bowl and stir the yeast into it. This was the trickiest part for me. I couldn't seem to get my yeast to activate. Coming from someone who hasn't baked with yeast in a century, I was clueless about the fine temperament of this stuff. Thank God I ran into my neighbor at the grocery store earlier that morning and she shared all the yeasty secrets with me. Too cold and it won't activate. Too hot and you'll kill the yeast. The answer is liquid that is between 110 - 115 degrees Fahrenheit. The yeast will dissolve easily and get all frothy after about five minutes. Perfect.
While waiting for the yeast to activate, beat all six eggs slightly.
Add the eggs to the remaining milk mixture.
Now add the dissolved yeast mixture into the milk and egg mixture.
Grab the all-purpose flour (or gluten-free flour blend in my case).
Stir in the sifted flour cup by cup. It would make good sense to do this in one of those fancy KitchenAid stand mixers. I don't have one. So I mixed by hand.
Or should I say forearm, bicep and elbow joint.
By the sixth cup of flour, this stuff was getting tough. My forearms were burning.
So I decided the proper thing to do was to take a little break with the Puppy Chow - chocolate and peanut butter coated rice Chex. You see, if I make a small entry point with the tin foil it means I wasn't eating the whole bowl all by myself. I only had a couple. Later in the day when asked where all the Puppy Chow went I'll clearly be able to say, "I don't know my dear, wherever could it have gone?"
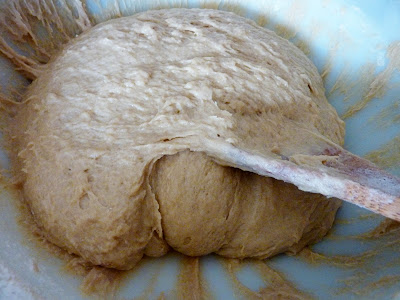
Back from break, continue beating the dough until it is firm and holds its shape all on its own. Let me tell you, this takes some serious beating. Like fifteen minutes by hand. This is a good opportunity to get all of your frustrations out. I do have memory of a bit of cursing coming from my mouth during that fifteen minutes of dough beating intensity. And sweating. Quite a bit of sweating on that Christmas Eve morn. Thank goodness the family was out to breakfast. It was starting to get ugly.
And then perfection. A hunk of dough that sits in a little round ball at the base of my bowl. Ahhh, so worth it.
Place a wet towel over the bowl and let rise in a warm place (82 degrees) until the dough is double in bulk - about two hours.
Once the dough is all set to rise, come back to the bacon. Remove lid and continue simmering on low until all the water has evaporated. This should take another couple of hours.
Once the dough has risen, remove towel...
and punch it down. This is possibly the funnest part of the day in my opinion.
Rewet the towel and place it over the bowl of dough. Let rise again. Approximately another two hours, maybe less.
Once the contents of the frying pan are well browned and the onion has disintegrated, place everything from the pan into a bowl and allow to chill in the refrigerator. This is approximately four or five hours from when it first began simmering.
When the dough is double in bulk again...
cut it into four sections.
Roll each section onto a lightly floured surface. The rolled dough should be a little less than a half an inch thick. Sidenote: My dough was incredibly sticky. This could be due to the gluten-free flour I was using, I'm not sure. To make it workable I folded quite a bit more flour into the dough at this point. That said, the moister the dough the tastier the bun. Get the dough to a place where you can work with it, but be advised not to make it too dry.
Cut circles with a cookie cutter or rim of a glass - approximately four inches in diameter.
Grab the cooled bacon out of the refrigerator.
Place a teaspoon of bacon into the center of each dough cutout. Don't exclude the bacon grease here. It truly is a very important part of all of this. As the bun begins to bake in the oven, the grease will permeate the surrounding dough and infuse a huge burst of flavor to the bun.
Fold the sides of the dough circle over bacon pressing the edges together to enclose the bacon completely.
Place lapped side down on a cookie sheet. Let rise again until double in size. Or not. Mine rose nicely in the oven without this extra rising step.
Bake in 375 degree (Fahrenheit) oven for 15 - 20 minutes. Optional step - when rolls are slightly tan, brush each roll with mixture of egg yolk and 2 tsps water. Return to oven and bake until golden brown about 10 minutes.
Gluten-Free sidenote: My rolls were finished baking after just 15 minutes. You'll know they are done when they are perfectly tan and the bacon grease is frying the bottoms to a crisp.
Serve rolls hot. And eat them cold in the morning for breakfast. If you have any left, that is.
Late in the day I was getting fatigued so I decided to try something I have never done before. A bacon bun rollup. Similar to a cinnamon roll, only with bacon inside. Such a lovely surprise!
Place the bacon in a thin layer over one of the quarter sections of rolled out dough. Begin rolling it up.
Keep rolling. Pinch ends of dough into the roll to seal it completely.
Please the bacon-full log in a pan with high sides. There will be grease.
Bake in the same 375 degree oven as the bacon buns for 15 - 20 minutes, possibly longer. It is done when the crust is perfectly brown and the grease is sizzling in the bottom of the pan.
I hope you enjoy these as much as I do!
Gero apetito!
To get you in the mood for this all day bacon fest...
The Lithuanian National Anthem


